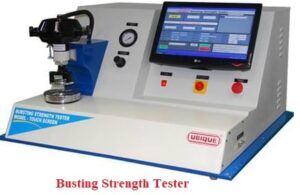
Standard Operating Procedure (SOP) for operation, calibration, and maintenance of Bursting Strength Tester used to analyze the packing material of drug products.
SOP for Bursting Strength Tester
1.0 PURPOSE:
-
- The purpose of this SOP is to describe the operation, calibration, and maintenance of the Bursting strength tester.
2.0 SCOPE:
-
- This SOP is applicable to the following bursting strength tester at the Quality Control Department in the pharmaceutical plant.
-
- Make: UBIQUE
-
- Model: AUTO
3.0 REFERENCE :
-
- Operation Manual.
-
- Instrument/Equipment usage log book – SOP.
-
- SOP for Preparation of internal and external (Third Party) Calibration schedule and calibration practices.
4.0 RESPONSIBILITY – SOP FOR BURSTING STRENGTH TESTER :
-
- QC Analyst shall be responsible for the operation and calibration of instruments as per SOP.
-
- QC Analyst shall be responsible for maintaining the record as per SOP.
-
- Head QC or Designee shall be responsible for training impartation, approval, and execution of SOP.
-
- QA shall ensure the implementation of the system as per SOP.

- QA shall ensure the implementation of the system as per SOP.
-
- QA head and Plant head shall approve the SOP.
5.0 ABBREVIATIONS:
-
- RPM: Revolution Per Minute.
-
- SOP: Standard Operating Procedure.
6.0 PROCEDURE – SOP FOR BURSTING STRENGTH TESTER :
-
General Procedure – Bursting Strength Tester
-
- Follow the SOP on Instrument usage logbook, for the entry of usage of the instrument.
-
- In case of any maintenance of the instrument, follow SOP on Maintenance of Laboratory Instruments.
-
- Affix the calibration label on the instrument as per SOP.
-
- Maintain the third party calibration schedule and the Internal calibration schedule for the instrument as per SOP, Preparation of internal and external (Third Party) Calibration schedule, and calibration practices.
-
Operational procedure -Bursting Strength Tester
-
- Check the calibration status.
-
- Calibrate as per the calibration procedure.
-
- Switch on the mains. This will retract plunger to its starting position, if it is not there, Electronic Digital Readout will be displayed.
-
- To select the type of the sample press MODE key then the digital display will show TYPE.
-
- Then using ARROW key select the type of the sample e.g. paper, board, others, and press ENTER.
-
- To select the unit of the pressure (PSI/Kg per sq cm), press the MODE key two times then the digital display will show UNIT. For selecting the unit of pressure, use the ARROW key.
-
- Position pneumatic Clamp selection switch mounted on the left side of the machine to MANUAL mode and manipulate Pressure Regulator Knob to set requisite sample clamping pressure.
-
- Then put the selector switch to AUTO MODE.
-
- Manipulate zero setting potentiometer knob on display unit keeping reset knob pressed, so that the display reads zero. Adjust pneumatic clamping pressure to the required level.
-
- Place the sample to be checked over the diaphragm plate.
-
- The sample size should be a minimum 100mm x 100mm.
-
- Actuate “PUSH FOR BURST” push button, for about 10 seconds.
-
- This will reset the electronic display unit to zero.
-
- The plunger will rotate at the constant speed of 120 RPM, pushing it steadily, building up the pressure till sampling bursts.
-
-
The display will freeze at the maximum reading at which burst has occurred.
-
-
- Lighting up of Peak-hold indication will indicate that a peak has occurred due to the burst of the sample.
-
- This will reverse the direction of plunger rotation, retracting it till it comes to starting position.
-
- Drive will stop automatically as soon as the plunger is fully retracted.
-
- Record bursting value is frozen by the display unit.
-
- Press the reset button for about 10 seconds to release peak hold = peak hold indicator will switch off, and the display will read zero once again.
-
- For emergency reversal/retraction of plunger, actuate the RED push button.
-
- For checking paper or other thin material with low readings-open diaphragm plate, place Adapter Ring, mount plane rubber diaphragm (used for paper tester Gauge I) instead of molded board rubber diaphragm (used for board tester Gauge II) after topping hydraulic fluid if required, once again fit diaphragm plate properly.
-
Calibration Procedure of Bursting Strength Tester :
-
- Auto Calibration Procedure – Bursting Strength Tester
-
- The pressure indicator digital display of the machine has a “CAL” mode. For this press MODE button 3 times. The display will show “CAL”.
-
- Press the ENTER button for self-calibration. On operation in this mode, this display should register drift of ZERO.
-
- This will indicate that pressure transducer and pressure indicators are in satisfactory condition.
-
- Record the calibration in the auto-calibration format.
-
- Calibration Frequency: Daily
-
-
Calibration by Standard Aluminum Foil – Bursting Strength Tester
-
-
- Place the standard aluminum foil for calibration over the diaphragm of the instrument.
-
- Actuate “PUSH FOR BURST” push button, for about 10 seconds. This will reset the electronic display unit to zero.
-
- The display will freeze at the maximum reading at which burst has occurred.
-
- Lighting up of Peak- hold indication will indicate that a peak has occurred due to the burst of the sample.
-
- Record bursting value is frozen by the display unit.
-
- Repeat the operation for a further minimum of two burstings.
-
- Record the average burst value in kg/cm2 in calibration format (Annexure-2)
-
- Tabulate the result.
-
- The result should be within the limit mentioned on the certificate of standard aluminum foil used.
-
- Calibration Frequency: Monthly ± 3 days or after any major breakdown.
-
- Calibration of pressure gauges by an external agency & Calibration Frequency: Yearly ±30 days
-
Maintenance of Bursting strength tester
- Replace the hydraulic fluid if there is leakage and if the level is low
Note: The hydraulic fluid used is 70% glycerin diluted with water.
-
- Change the oil after every 3 months or if required.
-
- Replace the diaphragm if it turns thin or burst.
-
- Replace the diaphragm as follows,
-
-
- Switch on the mains, retracting plunger to start position.
-
-
-
- Position Pneumatic clamp control switch mounted on the left side of the machine to MANUAL, thereby operating a pneumatic clamp-on the diaphragm plate directly without sample.
-
-
-
- Loosen the diaphragm plate nut by rotating counter-clockwise using the spanner.
-
-
-
- Raise the clamp and remove the diaphragm nut, plate and diaphragm.
-
-
-
- Wipe the diaphragm seal with an annular marked face clean with a dry lint-free cloth.
-
-
-
- Check the level of the fluid and replace the volume, if required, so that fluid forms slight meniscus above the surface of the diaphragm seat and also ensure that there is no air trapped in hydraulic fluid.
-
-
-
- Place the new diaphragm with its flat side down on the seat by sliding it across. For paper testers, the diaphragm is flat on both sides.
-
-
-
- Place the diaphragm plate carefully over the diaphragm.
-
-
-
- Place the diaphragm nut in its position and finger tighten it.
-
-
-
- Lower the pneumatic clamp till it touches the diaphragm plate.
-
-
-
- Tighten the diaphragm nut using the spanner.
-
-
- Ensure a uniform secure seating of diaphragm.
-
- Make about 10-15 dummy bursts using similar materials. This will condition the diaphragm for accurate tests, relieving its surface tension.
7.0 ANNEXURE – BURSTING STRENGTH TESTER:
Annexure-1: Calibration record of Bursting Strength Tester (Monthly)
Instrument Name |
Bursting Strength Apparatus | ||
| Instrument No : | Make /Model | Ubique | |
| Location | Calibration frequency | Monthly ± 3 days | |
| Calibrated on | Next calibration due on | ||
Procedure
-
- Place the standard aluminum foil for calibration over the diaphragm of the instrument.
-
- Actuate “PUSH FOR BURST” push button, for about 10 seconds. This will reset the electronic display unit to zero.
-
- The display will freeze at the maximum reading at which burst has occurred. Lighting up of Peak- hold indication will indicate that a peak has occurred due to burst of the sample.
-
- Record bursting value is frozen by display unit in a table given below.
-
- Repeat the operation for further two burstings.
-
- Record the average burst value in kg/cm2.
-
- The result should be within the limit mentioned on the attached certificate of standard aluminum foil used.
-
- Reference No. of Standard Aluminium foil : ___________________________________
-
- Reference Certificate No. of Aluminium foil : __________________________________
| Sr No. | Observed burst value of standard foil (kg/cm2) | Mean Burst value
(kg/cm2) |
Actual Burst Value of standard foil (kg/cm2) | |||
|
Remark: The instrument is calibrated & qualified /Out of calibration & not qualified for use.
| Done By: | Checked By: | Approved By: |
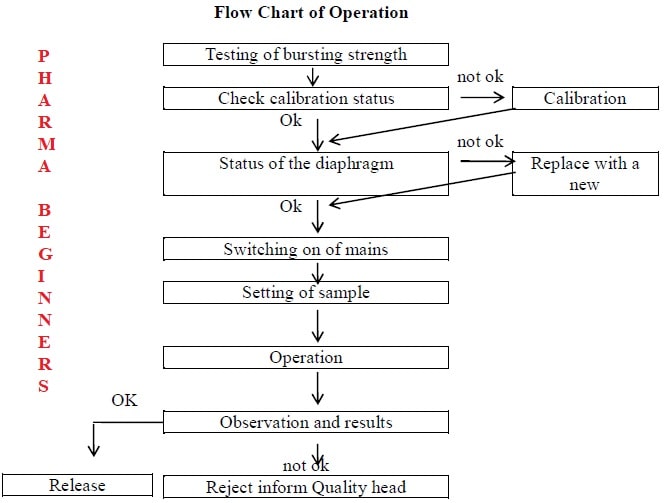
Annexure-2: Flow Chart of Operation of Bursting Strength Tester.

Annexure-3: Calibration Status Label.
|
CALIBRATION STATUS |
|
INSTRUMENT: |
|
MAKE: |
MODEL |
CALIBRATED ON: |
BY: |
NEXT CALIBRATION DUE ON: |
|


