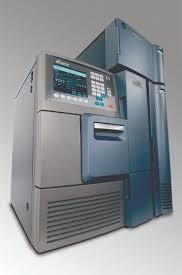
Standard Operating System (SOP) for Operation of Waters High-Performance Liquid Chromatography (HPLC) system. This procedure applies to the Waters – Alliance HPLC system.
SOP for Waters HPLC System
1.0 Purpose :
-
- This SOP is to describe the operation procedure of the High-Performance Liquid Chromatographic (HPLC) system (Make-Waters, Model-Alliance) in the Quality Control Department.
2.0 Scope:
-
- This SOP applies to the following Waters HPLC System in the Quality Control Department.
| Make | Model |
| Waters | e2695/2489 |
| Waters | e2695/2489/2414 |
| Waters | e2695/2489/2475 |
3.0 References and Annexures :
-
- References
-
- SOP for Instrument/Equipment usage log book.
-
- USP General Chapter : Chromatography <621>
-
- SOP for General Practice of HPLC/UPLC.
-
- User’s operating manual supplied by the manufacturer.
-
- SOP for Use and maintenance of HPLC/UPLC Columns.
Related: SOP for HPLC Calibration
-
- Annexure: NA
4.0 Responsibilities:
-
-
QC Officer shall be responsible for-
-
-
- Operate and maintain the instrument as per the SOP for Waters HPLC System.
-
- Inform to superior about any malfunctioning.
-
- Keep the instrument and its surroundings neat and clean.
-
-
Quality Head or Designee shall be responsible for-
-
-
- Training to all concerned persons before implementing the SOP.
-
- Ensure the operation of the instrument is carried out as per the SOP.
-
- Ensure proper documentation as per SOP.
-
- Review the SOP.
-
-
Quality Assurance shall be responsible for-
-
-
- Ensure the implementation of the system as per SOP.
-
- Regulatory Affairs, Quality Head, and Plant Head shall be responsible for-
-
- Approve the SOP.
-
- Ensure that proper practices are followed as per SOP.
5.0 Abbreviations used in the SOP for Waters HPLC System:
-
- Abbreviations
- Abbreviations
-
- HPLC: High-Performance Liquid Chromatography.
-
- MAU: Milli absorbance unit
-
- Max: Maximum pressure
-
- Min: Minimum pressure
-
- PDA: Photo Diode Array.
-
- Definitions of Term: NA
6.0 Procedure for Operation of Waters HPLC System:
-
-
General Procedure – Waters HPLC System:
-
-
- Follow the SOP on Instrument/ Equipment usage logbook, for the entry and usage of the instrument.
-
- In case of any maintenance of the instrument, follow SOP on Maintenance of Laboratory Instrument.
-
- Follow the SOP on the General Practice of HPLC System (Waters).
-
- Follow the SOP on Use and maintenance of HPLC Columns, SOP for the maintenance and care of HPLC Columns.
-
-
Operational Procedure of Waters HPLC System:
-
-
- Empower Software Operation :
-
- Ensure that all the -electrical power cords are connected properly and the computer is on standby to which the systems are connected.
-
- Switch on the Waters HPLC System Module e2695 by using the key located on the left side of the module.
-
- The module will start the initialization. Wait till the screen shows idle.
Related: SOP for Calibration of Waters HPLC System
-
- Fix the column if required and give the flow about 15 minutes and switch on the Waters HPLC System -Module 2489 (detector).
-
- The first status light will blink after the initialization of the lamp and status light will glow continuously.
-
- Double click ON “EMPOWER” icon on the desktop.
-
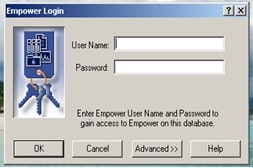
- The “Empower Login” window shall appear as below.
-
- Enter the “User Name” and “Password” in the respective option to gain access to Empower software on the database and click OK.
-
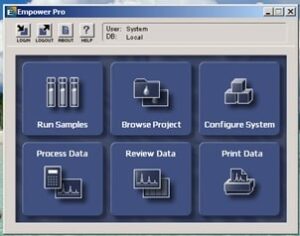
- The display shall be as below.
-
- The screen will appear as follows and click on the “Configure System” icon for “Creating Project”.
-
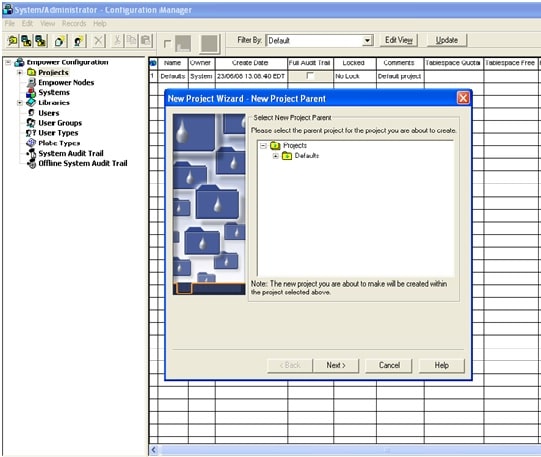
- The system/administrator – Configuration Manager will appear as follows.

-
-
To Create a new project: Click “File” =⇒ “New” ==⇒ “Project”.
-
-
- Select the parent project for which you want the current project to be a member.
-
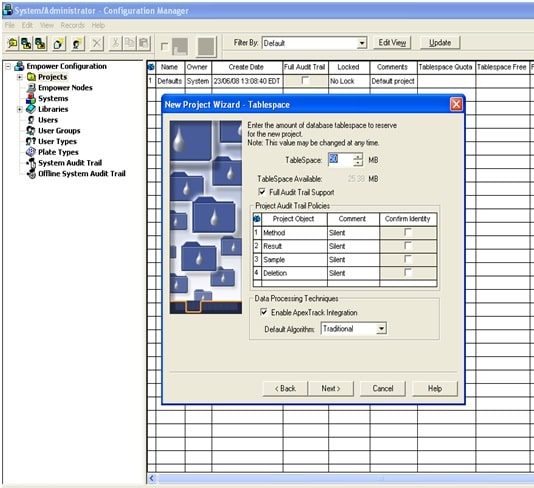
- The “New Project Wizard – Table Space” will appear.
-
- Select the database size you want to keep for the project.
-
- The database, processing technique enables apex track integration.
-
- Do not enable Full Audit trail support. then Click“Next”.
-
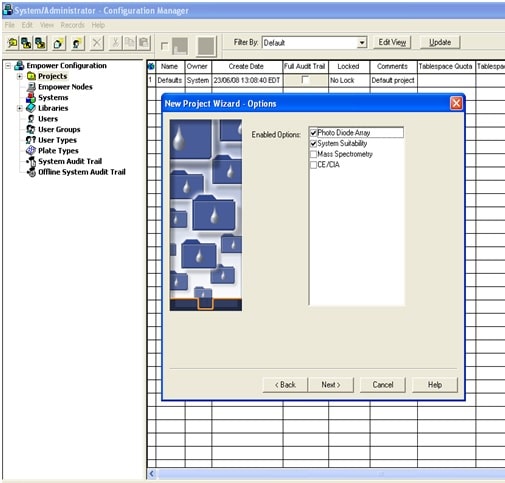
- The “New Project Wizard – Options” will appear. Put a check in “Photo Diode array” only if the detector being used with the system is PDA type and click next.
-
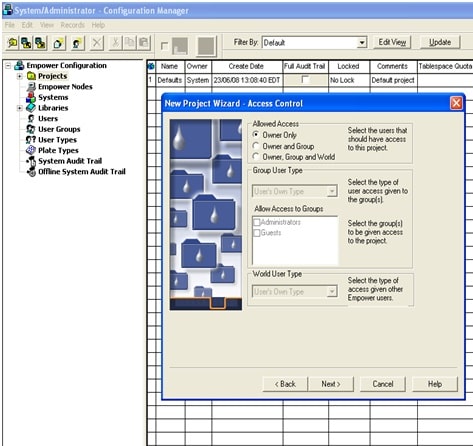
- The “New Project Wizard – Access Control” will appear.
-
- Select the user types for the access to the project. Owner, group, and the world and select guests in Group User Type and World User Type.
-
- Then click “Next” and the screen will appear as follows.
-
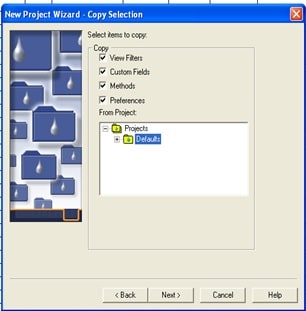
- The “New Project Wizard – Copy selection” will appear.
-
- Select the project from which you would like to copy the method or keep it as default.
-
- Then click “Next” and the screen will appear as follows.
-
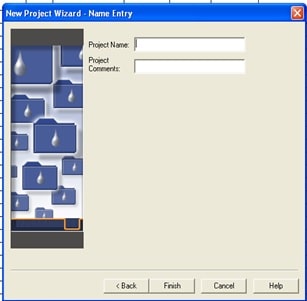
- The “New Project Wizard – Name Entry” will appear.
-
- Give the project name in the column of the project name and write the comments in the column of comment, then click on finish and screen will appear as-

-
- Again “System/administrator-Configure Manager” will appear. With the updated project name list, then close the project by going to file and click on exit.
-
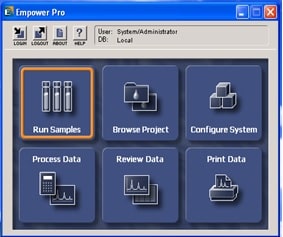
- To Create a new Instrument Method: Click on “Empower Pro” on the bottom of the computer screen Click “Browse Project”.
-
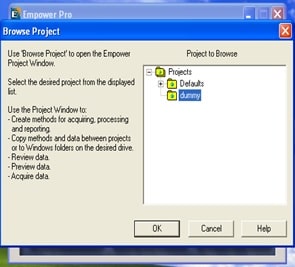
- Select the Project you want to open.
-
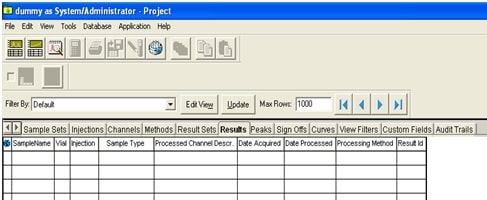
- The project will appear as follows…
-
-
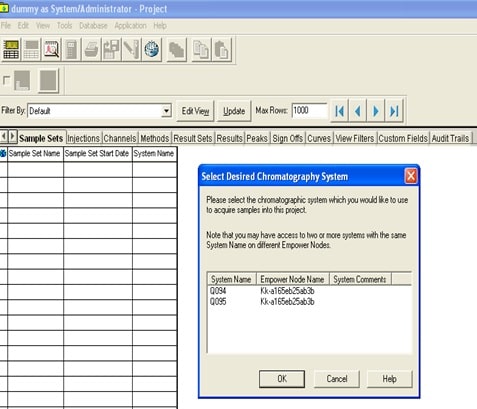
The terms used in the project window:
-
-
- Sample Sets: Sample sets are the series of the samples injected.
-
- Injections: Injections are the list of the injections with all information like date acquired, sample name, injection volume, vial, injection, etc.
-
- Channels: Channels are the raw data of the samples injected. This is the data that has to be processed.
-
- Methods: Shows the list of all methods ( Inst. Methods, Methods set, Processing method, Report method, Export method, etc. ) for the project.
-
- Results set: Set of the results, which is processed after sample set completion.
-
- Result: Results are the processed data, which are ready to be printed.
-
- Peaks: Shows identified peaks in a chromatogram.
-
- Sign off: Shows results that are signed off.
-
- Curves: Shows the stored calibration curves.
-
- View filters: It gives the details about what information is shown in the current table & order of the information.
-
- Custom fields: Shows custom fields if defined.
-
- Click on File =⇒ New method =⇒ Instrument Method And screen will appear as follows.
-
- Select Instrument in which you want to apply the instrument setting, then click OK.
-
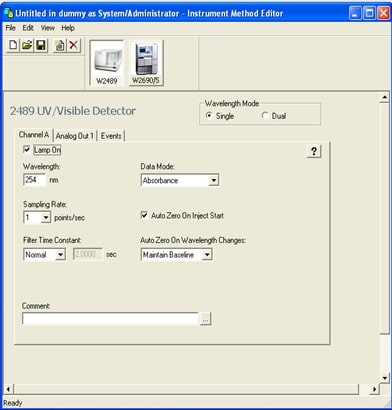
- Untitled Instrument method editor will appear.
-
-
Select the instrumentation parameters as per the chromatographic analysis.
-
-
- Select W2690/5 for the setting of the pump, column oven temperature, sample cooler temperature.
-
- Pump: edit flow rate, solvent composition, high-pressure limit, column temp, etc.
-
- Injection: edit the sample temp. Select the W2998, W2489, W2414, or W2475 whichever is applicable.
-
- For the setting of detector W2487 parameters.
-
- For Detector: edit analysis wavelength.
-
- The setting of detector W2489 parameters, Enter sampling rate 10 points/sec.
-
- Select the lamp ON option and edit the analysis wavelength.
-
- Once the entry of all instrument parameters is over, Click File =⇒Save =⇒ Instrument method Name the instrument method, then Click File =⇒ Exit.
-
-
For creating a new Method set :
-
-
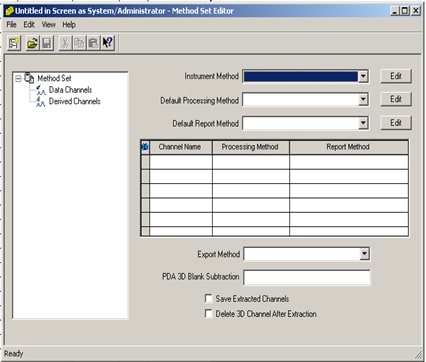
- Click File =⇒ New method =⇒ Method Set.
-
- The New method set wizard screen will appear.
-
- Select the instrument method for your chromatographic analysis from the instrument method drop-down list.
-
- Leave all other column blanks, then Click File =⇒ Save =⇒ Method set. Name the Method set, then Click File =⇒
-
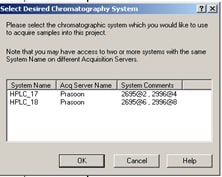
- Data acquisition & creating sample set / single inject.:- Click on “Tools” ===⇒ “Run sample” in your project window, And the screen will appear as follows…
-
- Now select System Name and click OK.
-
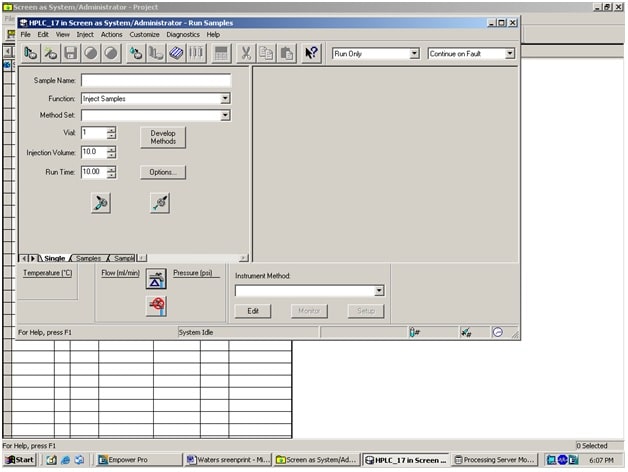
- Run sample window will open, and the screen will appear as follows…
-
-
The terms used in the Run sample window.
-
-
- Instrument Method: Select the instrument method for your analysis from the dropDown list.
-
- Set UP: Set up the instrument method for the initial flow condition.
-
- Monitor: Equilibrating the Column &monitoring the baseline before analysis.
-
- Sample set: edit the details of the samples for auto injections.
-
- Single inject: edit the details of the samples for a single injection.
-
- Edit: Edit the current instrument method.
-
- To build a new sample set goto File => New Sample Set Method=> Empty.
-
- Build the sequence by entering the sample set name, No of Injections, Function, Method set, Run time, the Analyst name, and Column No.
-
- Save the sample set by going to file and click on “save sample set method as” and give the sample name and click on save.
-
- To run the sample set go to inject and click on “run sample set”.
-
-
Creating Processing Method (For 2D Channel): –
-
-
- On the Project Screen ;
-
- Click on Channels, data whichever is stored will display
-
- Filter by: Select the option whichever is required to get the required data on the basis of date wise or sample name wise and click on update.
-
- Example: Select today and click on update all data whichever is stored today will display.
-
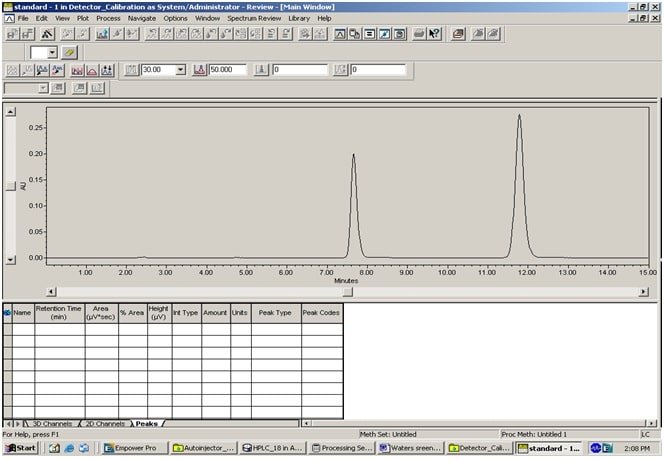
- Then select chromatogram you want to review by double-clicking it or Click =⇒ Tools =⇒ Review.
-
- The Review ( Main window ) will appear as follows.
-
-
Now click on Window => Processing Method.
-
-
- Click on the row below the time and select Valley to Valley under the type column.
-
- Select the ‘component’ button enter the name for the peak identification and enter the retention time, under the ‘RT window’ enter 1.
-
- Select the suitability button for the calculation of system suitability, put a check on the ‘calculate suitability results’.
-
- Enter the ‘Void Volume time’ and put a check according to the pharmacopeia for the calculation of system suitability parameters.
-
- Goto file Save as => Processing method => Enter the processing method name and Click save, go to File=> Exit.
-
- For Processing the data using the created processing Method.
-
- Select the chromatograms from the project for which you want to process the data applying the created processing method.
-
- Right-click on the selected injections and click on the process.
-
- Under the processing tab, put a check on the ‘Use specified processing method’, select the processing method from the drop-down list and select Calibrate and Quantitate and click OK.
-
- To view the processed data goto Results and click on update.
-
- Preview / Creating Custom Report Method & Print out
-
- On the Project Screen ;
-
- Click Results =⇒ Screen will appear as follows,
-
- Filter by: Select the option whichever is required to get the required data is processed on the basis of date wise or sample name wise and click on
-
- update Example: Select processed today and click on update all data whichever is processed today will display
-
- The screen will show as follows.

-
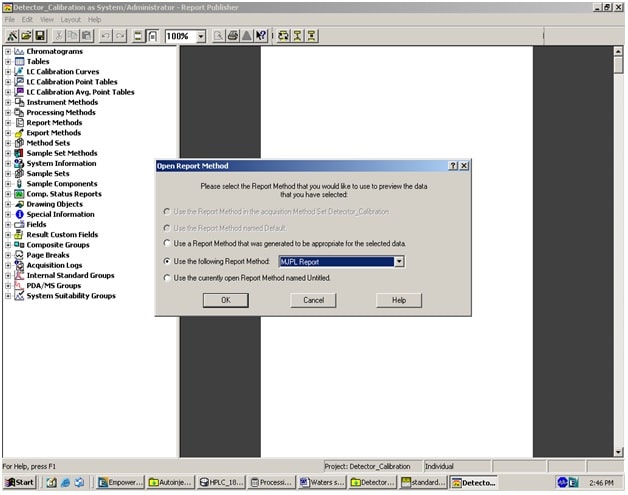
- Select the chromatogram you want to preview by double-clicking it OR Click =⇒ Tools =⇒ Preview/Publisher.
-
- The Preview/Publisher Report Screen will appear as follows.
-
-
Select the Report method suitable for the result and click OK.
-
-
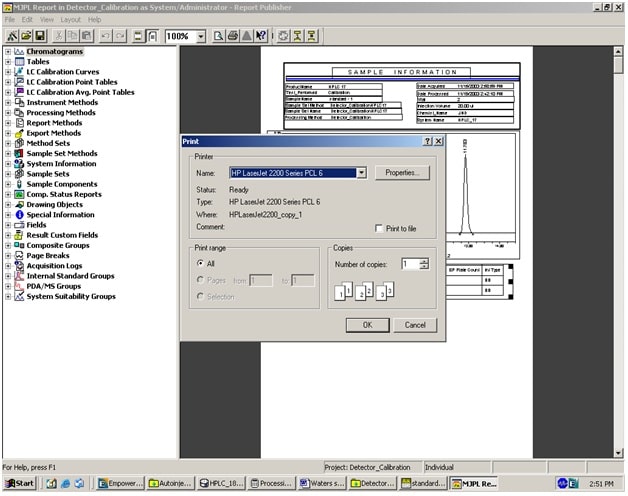
- If everything is OK, click close And Click =⇒ File =⇒ Print
-
- The screen will appear as follows…
-
- Select the printer and Click OK for Print.
-
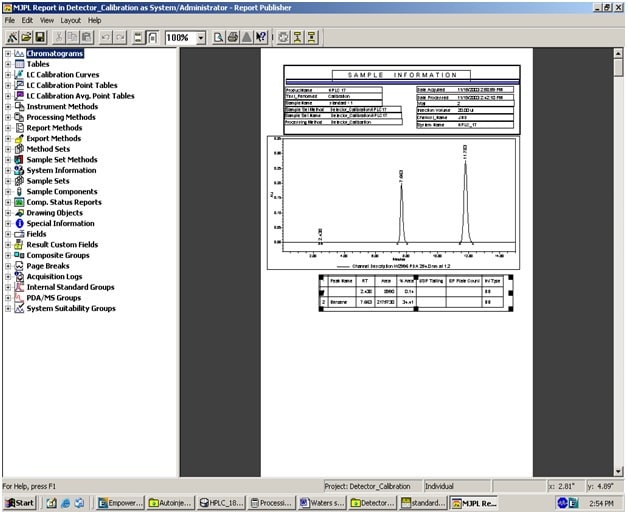
- If required customize the report method using the field available on the left side of the report publisher window.
-
- Its the screen will appear as follows…
-
-
Procedure for the general practice of Waters HPLC System:
-
-
- Whenever the system is changing solvent to the mobile phase or mobile phase to solvent, the analyst shall be prime the system.
-
- Open the valve located at the downside of the module e2695
-
- After getting the idle screen of the Alliance module press the MENU/STATUS key, Status (1) idle screen will be displayed
-
- Press direct functions then the screen will display the available functions, select the dry prime by using the upward and down word keys, and press OK if the solvent line is dry.
-
- The dry prime screen will display and select the required pump by pressing the respective key.
-
- Feed the duration time and press ENTER key, then auto priming takes place.
-
- After completion of the priming press the direct functions key then the screen will display available functions.
-
- Select the SYSTEM PREP by using the upward and down word keys, and press OK.
-
- Specify the initial condition of the separation method by selecting the flow rate and flow parameters, press next, and select the solvent that is used by the separation method.
-
- If the solvent line is not dry and the solvent reservoirs are full press start.
-
- The system preparation begins automatically.
-
- HPLC injection volume shall depend on the injector capacity.
-
- Injection volume in the HPLC shall not be less than 10 % of the capacity of the injector to get accurate results during analysis.
-
- After completion of analysis Analyst shall wash the column with appropriate solvents and keep the column to its designated place


Pingback: Out of Specification (OOS) Handling Procedure - Guidelines - SOPs
Pingback: Good Chromatography Practices - SOP & Guideline - Pharma Beginners