
The Development of hand-held Raman Spectrometers has drastically changed the manner of internal control for incoming raw material. Raman has provided advantages over alternative ways in this.
It doesn’t need sample pre-treatment or direct contact with the sample, and has the unique capability of having the ability to check a sample directly through a clear wadding like glass or plastic.
With the additional benefit of portability, hand-held Raman spectrometers significantly increase potency/productivity by eliminating the requirement of wet chemistry laboratory.
Raman Analyzer : Handling / Operation Procedure
1.0 PURPOSE:
-
- The purpose of this SOP is to describe the procedure of Operation and Handling of Enwave Optronics make handheld Raman Analyzer.
2.0 SCOPE:
-
- This SOP is applicable to Enwave Optronics make handheld Raman analyzer.
3.0 REFERENCES:
-
- In- House
- Operation manual supplied by the manufacturer.
4.0 RESPONSIBILITY: .
-
- QC Analyst shall responsible
- Operation and handling of the instrument as per the SOP.
- QC Analyst shall responsible
-
- QC Head shall responsible
- Ensure that the instrument is operated, calibration, Maintenance and the related documentation.
- QC Head shall responsible
-
- IT shall responsible
- Administrative rights of the instrument software.
- IT shall responsible
-
-
- Create/deactivate/modify the login ID and modify user privileges, data backup and restoration.
-
-
- QA shall responsible
- Ensure the implementation of the system as per the SOP.
- QA shall responsible
-
- Plant Head and QA Head shall responsible for approval of the SOP.
5.0 ABBREVIATIONS:
-
- IT : Information Technology
- LED : Light Emitting Diode
- LSR : Laser
- PQ : Performance Qualification
- SYS : System
6.0 PROCEDURE:
-
-
Turning ON the instrument :
- Turn the main switch ON.
- Instrument starts with beep sound.
- Both the SYS and LSR LEDs shall light up green.
-

-
-
- The “Welcome” screen will display. Click on “Enter” icon.
-

How does a Raman spectrometer work?
-
-
User control :
- There are three levels of privileges in the software:
- Administrator,
- There are three levels of privileges in the software:
-
-
-
-
- Supervisor and
-
-
-
-
-
- Operator.
-
-
-
-
- Administrator shall assign the user name and password.
-
-
-
- The Administrator shall from IT.
-
-
-
- Supervisor privileges shall give to Section Head or designee.
-
-
-
- Operator privileges shall give to the analyst.
-
-
-
- For the login creation on the Ramon analyzer, The concerned person shall fill the login form.
-
-
-
- Creation/Deactivation/Modification form as per and get it approved by Head QC Annexure-1 and shall submit to IT.
-
-
-
- In case any person leaves the organization or is permanently transferred to any other location, Deactivate the login ID.
-
-
-
- The user department shall fill Annexure-1 for the deactivation of the concerned login ID
-
-
-
- Submit the Annexure to IT.
-
-
-
- The concerned person from IT shall Create/Deactivate/Modify the login ID for the concerned person and shall maintain the user list as per Annexure-2.
-
-
-
- The login limits shall restrict to restrict the number of people who can log in simultaneously into the application.
-
-
-
- The system should logged out automatically after an inactivity of 30 minutes.
-
-
-
Logging In :
- Click “Enter” on the “Welcome” window to enter the login window.
-

-
-
- Move the Cursor to select the user name field and then press KEYPAD.
-
-
-
- The KEYPAD window will appear. Use the KEYPAD to enter the user name.
-

-
-
- Move the cursor to select the password field and press the KEYPAD to enter the password.
-
-
-
- Click “OK” after entering the User Name and Password.
-
-
-
- The main Home Page containing 6 main working function buttons will appear i.e Runs, Search, Library, Settings, Review and Logout.
-

-
-
Role of Function Keys :
- RUNS: For verification ID of supposedly known incoming material.
-
-
-
- SEARCH: To search and match unknown material using the instrument’s database.
-
-
-
- LIBRARY: Functions for spectral database management.
-
-
-
- SETTINGS: It permits users to do digital data management.
-
-
-
- REVIEW: Review and generation of reports for measurements.
-
-
-
- LOGOUT: To exit from their account.
-
-
- The privilege of users for access of the five main functions is as follows :

-
-
Performing the measurement :
- Verify the material is in the library as the procedure described below.
-

-
-
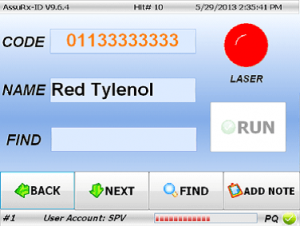
- Input the sample code or names in the FIND field to verify the material exist in the spectral library. Select the FIND button to enter material information.
-
-
-
- User will be brought to soft KEYPAD to enter the material information.
-
-
-
- Bar code scanner can also be used to fill the material code. Press the blue button and line up the bar code with the orange bar of light.
-
-
-
- After putting the information, Click FIND.
-

- If more than one potential result is found, an orange window will pop up, Click “OK”.

- Click through the NEXT button until the desired sample is reached.

-
-
Entering Sample information :
- After verification of the existence of material in the library, user shall enter sample information to specify the unique sample designation by selecting ADD NOTE.
-
-
-
- The information input page will appear for sample information input.
-
-
-
- Enter Lot No., Serial No., Vendor code, and Note.
-

- Return to the RUN page by selecting Done.

-
-
Measurements and sample verification:
- Samples where identification is required by IR/NIR or Perform Raman through this instrument.
-
-
-
- Place the sample in front of the measurement tip and press the measurement tip against the sample.
-
-
-
- Click RUN or the red button on handheld to begin the analysis.
-
-
-
- As the system is doing the measurement, the laser will be on and the red circle on the top right-hand corner will alternate between red and yellow.
-
-
-
- After the measurement by Raman is completed, the Run Results will shown.
- A green check indicates that the sample identity verification PASSED the verification.
-

-
- A green check indicates that the sample identity verification a red cross indicates that the sample FAILED the verification.

-
-
- Once the PASS/FAIL screen appears, the analysis is complete and create the electronic record in the system.
-
-
-
- To continue measurement for a new sample, click BACK button to return to the main RUN page.
-
-
-
- Seen by clicking on Spectrum how close the Run Results i.e. the measured spectrum matches to the spectrum in the database.
-

-
-
The SEARCH function :
- The SEARCH function provides a platform to perform unknown sample identification.
-
-
-
- In the fail screen, user can select the SEARCH function to find out what possible material.
-
-
-
- The SEARCH function in Raman can also access from the Main Menu for quick material identification purpose.
-
Note: This function can only made after daily instrument validation as mentioned above.
-
-
Features Screen of Raman:
-

-
-
- NAME – To shown the identified material name for measured sample.
-
-
-
- SCORE – This field shows the matching score of how close the sample in question matches the suggested match in the database.
-
-
-
- INDEX – This field shows the index number of the matching material in the Raman library.
-
-
-
- SCAN – USe for the SCAN button to measure the spectrum of the sample.
-
-
-
- BACK – Returns the user to the previous screen.
-
-
-
- NEXT – Shows the next recorded material closest in score.
-
-
-
- PREV – Shows the previous recorded material closest in score.
-
-
-
- REPORT – Allows the user to view the search report.
-
-
-
- Search sample identity from fail screen :
-
-
-
-
- When sample identity verification failed in Raman search window, user can perform a quick material identification using the SEARCH function to find out what material might have been mistakenly delivered as the incoming material.
-
-
-
-
-
- Click the SEARCH button to perform the search of the spectrum in the library.
-
-
-
-
-
- The material with closet match in spectral correlation will show up in the screen. User can determine if the two spectra looks closely enough to call the sample the identified material.
-
-
-
-
- Performing search measurements for quick sample identifications from main menu:
-
-
-
-
- Place the sample in position. Press the instrument’s measurement tip against the sample and press scan.
-
-

-
-
- As the system is doing the measurement, the laser will be on and the circle on the top right-hand corner will alternate between red and yellow.
-
-
-
- After a short time, the identifying material information will show up (Name, score, and Index).
-
-
-
- Click NEXT to show the next closest matching material.
-

-
-
- The report in the search window allows the user to view the search result.
-
RAMAN LIBRARY (Supervisor, Administrator) :
- Library function provides a platform for creating, editing and maintaining a database of spectra. It maintains a database of the material’s Code, name, HQI, and spectrum.
-

-
-
- On the left hand (RECORD) side of the EW-ID Database screen provides the function to ADD and EDIT a new or existing library entry. There are four buttons on the bottom of this side of window.
-
-
-
- ADD Button for adding a new record.
-
-
-
- The SAVE button is for saving the newly generated record.
-
-
-
- The DELETE button is for delete a record previously saved in the database.
-
-
-
- The EDIT button is for edit entries already in the database.
-
-
-
- On the right hand side of the EW-ID Database window, there are the Spectrum displays (top) and the record search (bottom) area for searching the material records already in the library.
-
-
-
- The user can use the Keypad function to input alpha numerical information for the library entry search.
-
-
-
- The SEARCH button is for the search action to find existing materials in the database.
-
-
-
- The CLEAR button clears the previous search.
-
-
-
- The REFRESH button is to refresh the search.
-
-
-
- The NEXT button is for browsing through the entries meet the search requirements.
-
-
-
- The EXIT is for exiting the database function.
-
-
-
Procedure for creating a new library :
- The following procedure shows how to create a new library entry.
-
-
-
-
- Click LIBRARY button to enter into EW-ID database page.
-
-

-
-
-
- In the Database window, click ADD at bottom left hand corner of the EW-ID DATABASE.
-
-
-
-
-
- It will prompt to enter the Material Code. It shall be noted that no duplicated material code is allowed for any two library entries.
-
-
-
-
-
- Use the soft keypad to enter the new code that is associated or assigned to the product being recorded. Click OK.
-
-
-
-
-
- The Material Code should appear in the Code field, and the sample description should also appear in the Sample field.
-
-
-
-
-
-
Click Acquire to obtain the spectrum of the material.
- Position the sample against the measurement tip. Once the sample is in position, click YES.
-
-
-

-
-
-
- Acquire Spectrum… window shows up.
-
-

-
-
- After the measurement finishes, the spectrum shows up to the right of the screen, and the “Acq Spec” and “Spectrum” fields automatically get filled in. Click on save to save the entry.
-
-
-
- Note:
- Another option for inputting a spectrum is to LOAD spectrum from data filed in the system.
- Note:
-
-
-
-
- The record number in database should increase by 1 from adding the new entry.
-
-
-
-
- Upon completion, click on EXIT to exit the database. Select YES to exit.
-
Searching the material in the Library :
- Click on the Search here field, Click Keypad.
-
-
-
- A Keypad window appears. Enter the search material name and click OK.
-
-
-
- Click the Search button. The search result shows in the window. 2 records were found for the searched keyword.
-
-
-
- Click Next button to see the next record.
-
-
-
- For new search, click Clear to enter the new search keyword.
-
-
-
- To undo the refine searching, click Refresh. All the record in the database will show, and it will be possible to click “Next” and “Prev” to see all the spectra in the Library.
-
Assign the same product name for a group of similar samples in the Library :
- Sometimes there can be a group of samples with same product name, but different vendor could require it to be identified as same product name.
-
-
-
- In this case, we can assign them all with the same PRODUCT NAME but with each one of them a different individual CODE.
-
-
-
- When user search in the RUN page the Product name that corresponding to several different CODE, many of the items will show up.
-
-
-
- User can then choose the exact code with desired variation of the product name for Identification.
-
-
-
- Once the spectrum of the measured sample match with the stored spectrum of the material with same code in the library.
-
-
-
- The result will show pass, otherwise it will show fail.
-
PQ-CAL” for daily instrument performance validation :
- The instrument requires a validation with the PQ-CAL (Performance Qualification and Calibration) function every time the instrument is turned on.
-
-
-
- The PQ-CAL function needs to be performed with the provided Polystyrene standard.
-
-
-
- The PQ-Cal measures the Raman spectrum of the provided polystyrene sample and compares it with the existing standard spectrum of Polystyrene in the library.
-
-
-
- If the correlation of the measured spectrum with the standard polystyrene spectrum, a pass message will be given.
-
-
-
- If the correlation does not meet the predefined correlation level, a failed message will be given.
-
-
-
- The new Polystyrene spectrum will be used to replace the existing standard Polystyrene spectrum whenever a passed PQ-CAL is performed.
-
-
-
- From the Main Menu, select RUN. You will be prompted to do PQ-Calibration.
-
Note:
-
-
- The red circle with an “X” at the bottom right hand corner of the screen. This indicates that PQ calibration has not been successfully completed yet.
-

-
-
- Follow the prompt and remove (unscrew counterclockwise) the PQ Calibration cap next to the instrument’s measuring tip. Then attach it to the tip and click OK.
-

-
-
- The user will be brought to the RUN screen. Click on RUN or press and release the red trigger to start measuring the calibration sample.
-

-
-
- Note: 1 -While the calibration is in progress, the circle indicating laser status will alternate between yellow and red.
-
-
-
- Note that the RUN button has faded out and that the red circle at the bottom right-hand corner is still there.
-
-
-
- While measurements are made, the two triangle LED’s near the front of the instrument will light red to indicate that the laser is on and is in use.
-
-
-
- After the measurement is completed, the RUN RESULT screen will appear with the results of the measurement either a green circle with a check mark to indicate PASS or a red circle with an “X” to indicate FAIL.
-

-
-
- If the instrument FAILS the PQ-Calibration, go back to the previous screen and redo the measurement.
-
-
-
- If after several tries and the calibration still FAILS, immediately inform the Head QC or designee to decide the further course of action and stop the activity on the instrument.
-
-
-
- Click BACK again to return to the RUN screen.
-
-
-
- The green circle with a check at the bottom of the screen indicates that PQ Calibration was successful and the instrument is now ready for measurements.
-
Precautions and safety :
- Never look directly into the laser light source at the laser output port or stare at the diffuse reflected beam.
-
-
-
- Never point the unit at anyone.
-
-
-
- The use of the Raman analyzer shall restrict to qualified and well-trained persons.
-
-
-
- Impart the training to the concerned person for its use as well to follow laser safety practices.
-
-
-
- In addition, all the personnel working in the area shall made aware about the potential hazards and regulations for the use of the instrument.
-
-
-
- Do NOT use the unit to measure thermally sensitive materials.
-
-
-
- There are no user serviceable components inside the device.
-
-
-
- Never open system enclosure without prior notification to the manufacturer staff.
-
-
-
- Any unauthorized attempt in opening system enclosure may cause personal injury.
-
-
-
- Take specific safety precautions depending on the nature of product/ material under testing and use proper PPE as required.
-
-
-
- Use small sample sizes and the lowest possible laser power setting to limit possible hazards
-
-
-
- The enclosure of the instrument protect tools and small wires greater than 1 milli meter to enter into the instrument and protect moisture from condensation enter into the instrument to damage it.
-
-
-
- Therefore avoid splashing and dropping of water on the unit. Water going inside the enclosure will lead to degradation or failure of the system.
-
Review :
- This function is better performed on a larger monitor connected to the USB port or on a separate laptop computer.
-
-
-
- The REVIEW function allows users to open up records of previously made measurements.
-
-
-
- This function can be accessed from the instrument’s Main Menu.
-
-
-
- Click REVIEW. The Open Record window appears.
-
-
-
- Select the desired folder under Record folder.
-

-
-
- The record file in the selected folder appears on the right side window.
-
-
-
- Select the desired record, Then Click REPORT.
-
-
-
- Generate a report. Use the magnifying glass function to zoom in on the report.
-
-
-
- Select the printer from the printer icon to print the report.
-
-
-
- Once finished, select the EXIT button to return to the previous screen.
-
-
-
- Then select BACK to return to the Main Menu.
-
Logging out and shut down :
- Once a user is done with using the system, the user should logout to prevent unauthorized use of the instrument under that user name.
-
-
-
- Go to the Main Menu and select LOGOUT.
-
-
-
- User will ask to verify logging out of the system. Select OK to logout.
-
-
-
- After logging out of the system, the user will brought to the START UP page.
-
-
-
- Select the SHUTDOWN icon.
-
-
-
- Log book entry shall done in instrument/equipment usage log book as per SOP No. BSQS/059 during every use of the instrument.
-
Sync for downloading data into another storage Device or computer :
- The SYNC function is for download and synchronizes the contents in system folder (Enwave IO) into an external USB drive or other storage device.
-
-
-
- SYNC function provides a convenient way of transfer data for review and report printing purpose on a separate computer.
-
-
-
- For SYNC function to work properly. Require an USB drive .
-
-
-
- Plug the USB drive into the appropriate port in the instrument.
-
-
-
- Click the SYNC icon from System Settings page.
-
-
-
- The SYNC window will appear.
-
-
-
- Click on VERIFY FOLDER to make sure that the “Enwave IO” Folder exists in the USB.
-
-
-
- If the Enwave IO folder is newly established, it will take longer time for the synchronization process to download the instrument data into the USB storage device.
-
-
-
- Click on SYNC will download the newer information in the ASSU℞ device into the folder with the same name in the USB drive.
-
DB for spectral database selection :
- If the user would like to use a specific database for the current verification session,
-
-
-
- Select the “DB” icon from the System Settings page.
-
-
-
- Then select the appropriate database to use and load the database (LOAD DB).
-
-
-
- Select the DB icon. Then, a Select Database window opens up.
-
-
-
- Highlight a selected Database from the list.
-
-
-
- Press ↓LOAD DB to load the database to the instrument.
-
-
-
- Select YES to continue with the database selection;
-
-
-
- Go with No to abort the selection.
-
-
-
- After loading the database,
-
-
-
- Select BACK to return to the System Settings screen.
-
Pingback: GC Column - Receipt, Performance Check and Care - Pharma Beginners
Pingback: Technology Transfer SOP of Drug Product - Pharma Beginners